
We are reader-supported. We may earn from links to products. Read our Disclaimer for more.
Originating in the 1800s, coffee cupping was once a merchant’s way of deciding what coffee to buy. Merchants would taste a variety of coffee while checking their consistency along with other characteristics to help their decision-making.
Coffee cupping was initially introduced to ensure that coffee had no defects. But it eventually evolved into a way to test the different flavors and characteristics of a variety of coffee, with the hope of making a well-informed decision when buying or selling coffee.
Coffee cupping is a popular and effective means of analyzing different coffee samples side by side.
Nevertheless, coffee cupping extends beyond decision-making and characteristic ascertaining. It can also be used to determine better roast profiles, brewing techniques, and more.
Chris Kornman, Lab and Education Manager at The Crown: Royal Coffee Lab & Tasting Room, describes coffee cupping as:
I like to think of cupping as peering through a window into a coffee’s potential. By dissecting and analyzing the core elements of taste like sweetness, acidity, and aftertaste, as well as more ephemeral and esoteric characteristics of flavor notes, we can get perspective on how best to showcase the coffee’s best attributes, whether in a different style of production roasting or when it’s brewed in service as a pour over or espresso, for example.
How To Carry Out Coffee Cupping
To properly carry out coffee cupping, you are going to need the following items:
- 20 grams of different varieties of coffee
- Kettle
- Grinder
- Timer
- Cups for the coffee
- Cupping spoons
- Glass, bowl, or mug to serve as a holder for cupping spoons
- Pen/pencil
- Coffee evaluation form
When picking your equipment bear in mind that consistency is key. All cups should be of the same dimensions, material, and volume. Consistent equipment equals similar ratios of water to ground coffee.
Before you start coffee cupping, be ready with your coffee evaluation form and pen to take note of the aroma, flavor, body, and aftertaste. Each person’s palate differs, so what you may pick up from a coffee’s taste another person might completely miss or label differently.
Coffee cupping should be done in an environment with lots of space, and quiet, and little to no distractions. This way participants can give their complete, undivided attention to the process.
Step 1 – Arrangements
Coffee cupping is a smooth and hassle-free process especially when everything is organized ahead of time. To begin the arrangements, you should set out the cups for the coffee and place the bag of coffee in front of the cups. Do this for every variety of coffee.
Also, place a bowl of hot water near the coffee cups. This water would be used to clean the cupping spoons after they’ve had contact with the coffee before using them for the next coffee.
Step 2 – The Grind
To prevent the past coffee from impeding the next, grind 2 grams of coffee in the grinder before grinding the remaining 18 grams. Each coffee should be ground to reveal a rough/coarse texture.
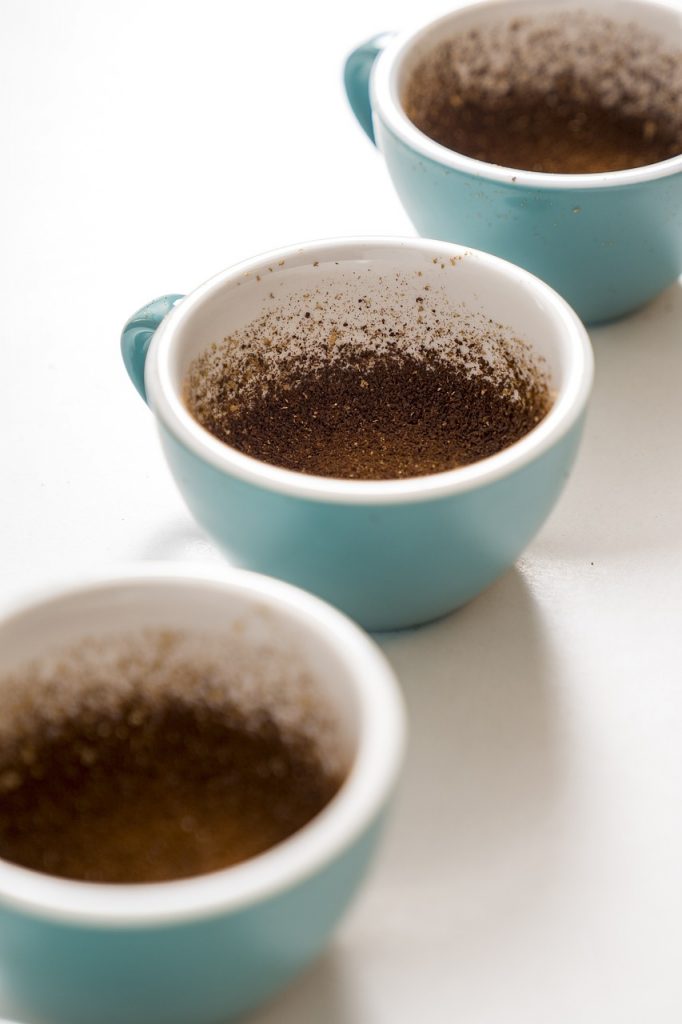
Step 3 – Dry Aromatics
Take three or two measures of 9 grams of a variety of coffee and place them in two or three cupping bowls. This makes it easier to prevent any defect or mishap from disrupting the accurate assessment of the coffee.
Now you evaluate the dry fragrance of each sample and write it down.
Step 4 – Wet Aromatics
Boil your water up to 200° Fahrenheit. Start the timer and empty 150 grams of boiling water into each cup of coffee. Then you evaluate the aroma of the wet coffee. And of course, don’t forget to write it down.
Step 5 – Break The Crust
Once the timer hits 4 minutes, it is time to break the crust. Take the cupping spoons and start crushing the coffee grounds by pressing them to the ground of the cup. Do this for each cup but wash the spoon after use in every single cup.
Step 6 – Cool The Coffee
With the help of two cupping spoons remove the leftover coffee grounds and foam. You give the coffee some time to cool, and once the timer hits 15 minutes, the coffee tasting can begin.
The taste of coffee changes once it’s cool, so you can also taste it as it’s hot. Don’t forget to take notes.
Step 7 – Coffee Tasting (Don’t Forget To Slurp)
Coffee tasting is when you are meant to bask in the different ranges of tastes offered by the coffee. And the best to do this is by slurping, so don’t forget to slurp when coffee tasting.
While tasting the coffee, you should look out for its acidity, body, sweetness, flavor, and balance.
It is totally okay to use a different measurement aside from the ones mentioned in this article, all you have to do is ensure whatever measurements you use for one variety of coffee, use it for other varieties.
Do everything explained in this article for every single variety of coffee, and of course, don’t forget to note down the differences. Carefully observe the flavor, body, etc of each coffee.
It’s totally okay if your first cupping isn’t as fantastic as you’d like. Remember practice makes perfect, so keep trying and eventually, you’d be a pro.
To help you develop and grow your cupping skills, it is best to cup with others. Not only is it more fun, but you will also learn by observation.
Even when you are not cupping, work on your palate by treating every meal and drink as practice. Taste different kinds of chocolates together or different fruits of similar types. And if you’re struggling to identify specific notes or flavors, repeatedly sample food or drink that contains those notes.
Do all of this and in no time you’d be cupping like a pro.